
How to Hike Downhill

My wife Tina never got tired of waiting at the bottom of some long descent—or at least she never showed it.
For the first several years we spent hiking together—back when a “thru-hike” was little more to us than some inexplicable abbreviation—I would motor uphill, only to lag badly on the way back down. I loved ascending from the start (see those tips here), because I was good at it. But I cursed the other direction for the opposite reason. Whatever faint sense of machismo I had made me wonder if women’s physiology was better suited for descending trails, or if my then-girlfriend was simply showing off. My final verdict? I was just really bad at hiking downhill.
But this not-so-radical act of self-acceptance coincided with a burgeoning ambition to climb bigger mountains—and so, to come down them, too. If I were going to do that, especially safely, I knew I’d need to get better at the seemingly easier part of hiking that, at least, for some of us, is torturous on the knees and nerves. Where getting better at going up, though, seemed intuitive and even obvious, improving my technique and pace at downhill hiking was a mystery. How do you get better at what is essentially controlled falling?
Well, turns out, by falling, getting up, figuring out why you fell, and doing something about it the next time. During 10,000 miles of thru-hiking, I’ve tumbled so many times (mostly while going down) that I’m lucky to remain in one piece. I’ve considered and internalized my errors and gotten much faster and more confident in my strides down both modest trail and steep mountain.
But I’ve still wondered about the techniques and tricks out there that make a hiker great on descents. So a few weeks ago, I called Mandie Majerus, a Washington State-based physical therapist and avid adventurer who has worked on bodies in Antarctica, helped launch the Alpine Training Program, and long been a part of the U.S. Ski Team’s medical pool. “When I’m on trail, I can feel the increased forces going downhill versus uphill,” explains Majerus. “And that’s because there is an increased tensile force going downhill, because that’s an eccentric contraction, not concentric. That puts more demand on the muscle. We have to make sure we train that way.”
I wanted to know if the changes I’d made to help train myself might help others descend, too. Turns out—and I’m sorry for this joke—but maybe I’m on a roll?
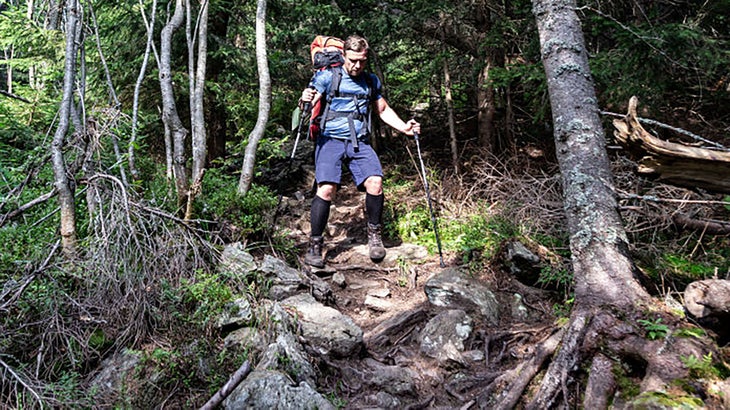
Pay Attention to the Terrain
Unless you’re on an exposed ridge, there’s typically only so far you can fall while hiking upward. You stumble, maybe you skin your knee, and you get back up and press on. Falling while hiking down is, of course, an entirely different proposal, since the same gravitational forces that ostensibly make going down easier can also send you end over end or headlong into a tree. And for my money, there’s no easier way to hate an activity than to get badly injured while doing it. So watch out for roots that will trip you, rocks that may give way, or sand, water, and snow that may make the next surface more slippery than the last. I often compare hiking downhill to clambering through a new-to-me boulder field, when I am acutely aware that each rock may shift and cause me to wipe out. The mental calculus of this awareness eventually becomes automatic. And when you do slip, you’ll know enough about the terrain around you to respond.
In fact, hikers not paying attention are one reason Majerus still has a job. She can “prehab” athletes all she wants in order to prevent overuse injuries, but mindless accidents will always happen. “People say ‘Aren’t you putting yourself out of business by giving us advice before we’re hurt?’” she explains, laughing. “But people lose attention for a moment, and things happen that are beyond their control. They can still come to us.”
Keep a Loose Body Posture
Majerus wants you to visualize a basketball player catching a pass and immediately shifting into the famous triple-threat stance. Their feet are shoulder-width apart, with their knees slightly bent, chest out, and their head up. They can survey the court before them, then shoot, pass, or dribble from that position as the situation demands. They are in a versatile position, body loose and ready to react.
No, Majerus doesn’t want you to drop into an actual triple-threat stance on trail, but the mechanics aren’t so different: Maintain a slight bend in the knees, but mostly remember to avoid tensing up throughout your body, as if you’re trying to preempt a spill by resisting gravity. Indeed, for years, this was my foible. I’d stiffen while descending, locking my back and butt and knees with oaken obstinance, hoping to fend off the inevitable. And then, of course, I would fall, anyway; my muscles would ache, too, from the exertion of my tetanus-like rigidity. When we’re loose, we already have an advantage when something bad does happen, because we’re ready to respond like that basketball player. Our bodies know how to move downhill; we just need to give them space to do so.
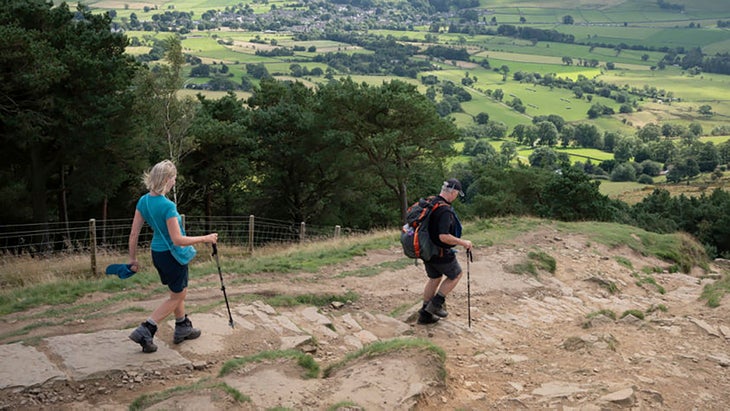
Plant Your Heels
If you’ve ever walked down a steep snow field, you’ve probably used the plunge step. That is, you sit back in your stride with a slightly wide stance and plant one heel in the snow; you settle in and then repeat with the opposite foot, your heel again cutting into the snow first. Walking down a steep hill sans snow? Do a less hyperbolic version of the same motion, bending your knees and leaning into your butt ever so slightly while leading with your heel. Follow through your arch and, just as you start to rise on your toes, repeat with the other foot. You’ll modulate momentum this way by counteracting gravity from your very position. Too, you’re using a more stable part of your foot.
If you’re a fast runner, this may feel counterintuitive, since running swiftly downhill often entails landing on your toes or maybe your midfoot, with your heel barely touching the ground if at all. Coming off a glacier and onto scree one time, Majerus remembers a friend telling her to just run to the bottom already. “Those were the biggest splits I’ve ever done, with a huge pack on,” she says, grimacing. “I destroyed my adductor muscles where the groin is. Why did I do that? I had been in walk mode, back on my heels a little bit. When I started running, I had nothing beneath me.”
Keep Your Weight Off of Your Hiking Poles
We’ve all seen and possibly even done it (I’m guilty): someone leaning so far forward over their hiking poles that they look like some kind of quadruped robot from a sci-fi series or a tech-school’s cutting-edge lab. It feels instinctive, of course, not only to give yourself more points of contact with the ground but also to feel like you’re parallel with the slope. But best-case scenario, your back is going to ache when you reach the bottom; worse-scenario case, you hurtle onto your face should your foot catch anything or the poles slide out from loose terrain. Don’t do it, then. Remember your bent knees and planted heels, and keep your poles to your side or barely out front. Think of them a little bit like a backhoe’s stabilizers, appendages that keep the machine from tipping as it works.
Pole length and size, however, comes down to personal preference, and one of the only wrong scenarios with them is what I describe above. Majerus suggests poles be high enough to render a 90-degree angle at the elbow; if I’m going down something especially steep, I might make them slightly longer in order to catch myself better during a big missed step. What’s more, if I’m using poles at all, I use only one, Warren Doyle-style, because it keeps me more aware and reactive. But that’s just me. “Poles create a little lateral stability, though ultimately, we want our glutes and core to create that lateral stability,” says Majerus. “But I’ve seen people who want to keep charging up and down mountains as they get older, and maybe they lose a little eyesight. Think of a pole as a proprioceptive feedback tool.”
Practice and Prepare
If you’ve ever been on a long downhill run or hike, you understand the strain it puts on your quads after you wake up the next morning and shuffle through your house, wondering if your legs will ever again feel whole. Remember, after all, what Majerus said about the force that the legs are enduring and about downhill exercise being eccentric exercise—that is, the muscle is extending. To prepare the quads, Majerus recommends Bulgarian split squats. But it’s not only your quads that need help; your hamstrings should be sharing slightly less of the load, at an approximate ratio of three to two. Make sure to stretch and load those, too. And given the relative gravitational perils of going downhill (that is, taking a big spill), remember to work on stability beyond toting trekking poles: core strength, glute exercises, single leg deadlifts, basic balance drills.
Last tip? Find ways to actually practice going downhill, whether that means having someone drop you at the top of progressively higher roads or simply as part of a long weekend hike. Several months ago, I moved to the top of a canyon in Colorado’s Front Range, and I run 20 miles down its paved switchbacks almost every Sunday, getting faster and more confident each time. I can already feel that accreted strength back on trail. Please don’t suddenly go from flat city greenways to hill repeats on the South Rim of the Grand Canyon, but go practice going down, and your hiking will get stronger and more enjoyable. You don’t want to make someone wait, right?
link


![‘Project Hail Mary’ Review: Ryan Gosling is Stuck Between a Rocky and a Hard Place in Crowdpleasing Sci-Fi Buddy Movie Adventure [A-]](https://i0.wp.com/awardswatch.com/wp-content/uploads/2026/03/PHM_30245_R2_rgb-scaled.jpg?fit=1200%2C800&ssl=1 "‘Project Hail Mary’ Review: Ryan Gosling is Stuck Between a Rocky and a Hard Place in Crowdpleasing Sci-Fi Buddy Movie Adventure [A-]")

